[참고] 2-06 데이터 저장 - 점프 투 장고 (wikidocs.net)
2-06 데이터 저장
* `[완성 소스]` : [github.com/pahkey/jump2django/tree/2-06](https://github.com/pahkey/jump2django/tr ...
wikidocs.net
데이터 저장
- 답변 등록 폼
- URL 매핑
- 뷰 함수
- 답변 저장
- 답변 조회
- 답변 등록 폼
<h1> {{question.subject}}</h1>
<div>
    {{question.content}}
</div>
<form action="{% url 'pybo:answer_create' question.id %}" method="post">
    {% csrf_token %}
    <textarea name="content" id ="content" rows="15"></textarea>
    <input type="submit" value="답변 등록">
</form>
질문 상세 템플릿에 답변을 저장할 수 있는 폼을 만들어주었다.
- form 사이에
- textarea와 input을 추가함
- textarea는 답변내용을 입력하는 곳
- input은 답변을 저장하는 버튼
- 이때 csrf_token은 보안과 관련된 항목이다. form으로 전송된 데이터가 실제 유저가 작성한 데이터인지 검증하는 역할을 한다. csrf_token을 통해 해커가 일방적으로 csrf_token을 보내도 블록킹할 수 있게 된다.
csrf란, cross site request forgery의 약자로,
웹 사이트 취약점 공격을 방지하기 위한 기술이다.
장고가 세션을 통해 csrf 토큰 값을 발행하고, 웹 페이지에서 폼을 전송할 때 토큰을 함께 전송하여 실제 웹 페이지가 작성된 데이터가 전달되었는지를 검증하는 기술이다.
- URL 매핑
이제 질문 상세를 만들어준 곳에도 url 매핑으로 별칭을 만들어준다.
from django.urls import path
from . import views

app_name = 'pybo'

urlpatterns = [
    path('', views.index, name='index'),
    path('<int:question_id>/', views.detail, name='detail'),
    path('answer/create/<int:question_id>/', views.answer_create, name='answer_create')
]
- 뷰 함수
그리고 위에서 views.answer_create 화면을 보여주기로 약속했으므로
views.py 함수를 수정해준다.
from django.shortcuts import render, get_object_or_404, redirect
from .models import Question
from django.utils import timezone
# Create your views here.


def index(request):
    question_list = Question.objects.order_by('-create_date')
    context = {'question_list' : question_list}
    return render(request, 'pybo/question_list.html', context)

def detail(request, question_id):
    question = get_object_or_404(Question, pk=question_id)
    context = {'question': question}
    return render(request, 'pybo/question_detail.html', context)

def answer_create(request, question_id):
    question = get_object_or_404(Question, pk=question_id)
    question.answer_set.create(content=request.POST.get('content'),create_date=timezone.now())
    return redirect('pybo:detail', question_id=question.id)
- question_id : url 매핑으로 값 전달
- request 객체로 입력한 내용을 받아온다. (그래서 request.POST.get('content')로 텍스트창의 내용을 읽어오는 것)
- 답변 생성을 위해 question.answer_set.create() 사용
- redirect 함수는 페이지 이동을 위한 함수
- 답변 저장
<h1> {{question.subject}}</h1>
<div>
    {{question.content}}
</div>

<h5>{{question.answer_set.count}}개의 답변이 있습니다. </h5>
<div>
    <ul>
        {% for answer in question.answer_set.all %}
            <li> {{answer.content}}</li>
        {% endfor %}
    </ul>
</div>

<form action="{% url 'pybo:answer_create' question.id %}" method="post">
    {% csrf_token %}
    <textarea name="content" id ="content" rows="15"></textarea>
    <input type="submit" value="답변 등록">
</form>
- 답변 조회
스태틱
그럴싸한 화면을 만들기 위한 스타일 시트(css 파일)
- 스태틱 디렉토리
settings.py에 스태틱 디렉토리를 추가해준다.
그리고 실제로도 manage.py와 같은 위치에 static 폴더를 만들고, 그 안에 style.css 파일을 추가한다.
- 스타일시트
textarea {
    width:100%;
}
input[type=submit]{
    margin-top:10px;
}
- 템플릿에 스타일 적용
{% load static%}
<link rel="stylesheet" type="text/css" href="{%static 'style.css'%}">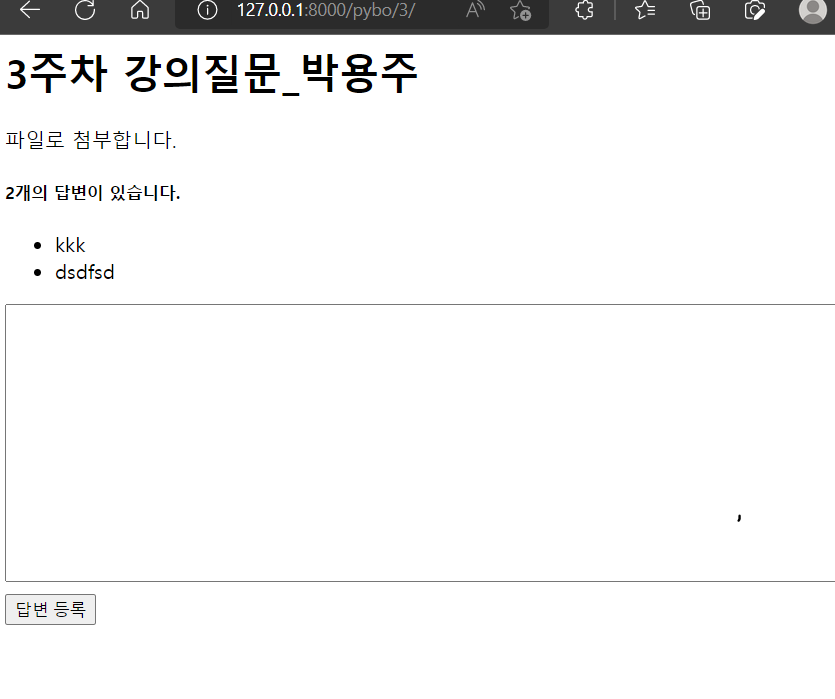
업데이트된 것을 확인해보면, 이렇게 모양이 달라진 걸 알 수 있다.
부트스트랩
- 디자이너 없이도 웹페이지를 괜찮게 만들 수 있게 도와주는 프레임워크
https://getbootstrap.com/docs/5.1/getting-started/download/ 여기서 다운 받을 수 있다.
{%load static%}
<link rel="stylesheet" type="text/css" href="{%static 'bootstrap.min.css'%}">

<div class="container my-3">
    <table class="table">
        <thread>
            <tr class="table-dark">
                <th>번호</th>
                <th>제목</th>
                <th>작성일시</th>
            </tr>
        </thead>
        <tbody>
            {%if question_list%}
            {%for question in question_list%}
            <tr>
                <td>{{forloop.counter}}</td>
                <td>
                    <a href="{%url 'pybo:detail' question.id %}">{{question.subject}}</a>
                </td>
                <td>{{question.create_date}}</td>
            </tr>
            {%endfor%}
            {%else%}
            <tr>
                <td colspan="3">질문이 없습니다.</td>
            </tr>
            {%endif%}
        </tbody>
    </table>
</div>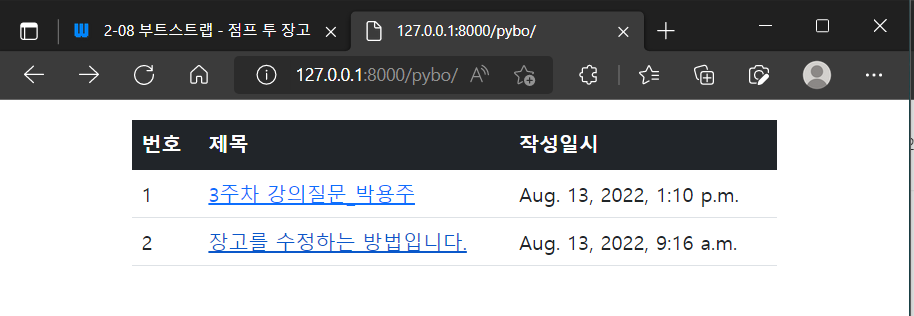
부트스트랩 스타일을 이용해서 화면을 테이블 형식으로 바꿔주었다.
{% load static%}
<link rel="stylesheet" type="text/css" href="{%static 'bootstrap.min.css'%}">

<div class="container my-3">
    <!--질문-->
    <h2 class="border-bottom py-2">{{question.subject}}</h2>
    <div class="card my-3">
        <div class="card-body">
            <div class="card-text" style="white-space: pre-line;">{{question.content}}</div>
            <div class="d-flex justify-content-end">
                <div class="badge bg-light text-dark p-2">
                    {{question.create_date}}
                </div>
            </div>
        </div>
    </div>
    <!--답변 -->
    <h5 class="border-bottem my-3 py-2">{{question.answer_set.count}}개의 답변이 있습니다. </h5>
    {%for answer in question.answer_set.all%}
    <div class="card my-3">
        <div class="card-body">
            <div class="card-text" style="white-space:pre-line;">{{answer.content}}</div>
            <div class="d-flex justify-content-end">
                <div class="badge bg-light text-dark p-2">
                    {{answer.create_date}}
                </div>
            </div>
        </div>
    </div>
    {%endfor%}
    <form action="{% url 'pybo:answer_create' question.id %}" method="post" class="my-3">
        {%csrf_token%}
        <div class="mb-3">
            <label for="content" class="form-label">답변내용</label>
            <textarea name="content" id="content" class="form-control" rows="10"></textarea>
        </div>
        <input type="submit" value="답변 등록" class="btn btn-primary">
    </form>
</div>
질문 상세도 부트스트랩을 적용해서 화면을 바꿔준다.

템플릿 상속
웹 페이지가 정상적으로 작동하려면, 템플릿이 아니라 표준 HTML 구조를 가지고 있어야 한다.
- 표준 html 구조
- 템플릿 상속
이제 질문 목록, 질문 상세 템플릿을 표준 HTML 구조로 수정해보자.
ㄴ base.html
장고는 기본 정보(css 파일 이름, head 같은 것들)를 한 번만 쓸 수 있도록 템플릿 상속 기능을 제공한다.
템플릿 상속은 기본 틀이 되는 템플릿을 먼저 작성하고, 그 위에 다른 템플릿에서 상속해서 사용하는 방식이다.
{% load static %}
<!doctype html>
<html lang="ko">
    <head>
        <meta charset="utf-8">
        <meta name="viewport" content="width=device-width, initial-scale=1, shrink-to-fit=no">
        <link rel="stylesheet" type="text/css" href="{%static 'bootstrap.min.css'%}">
        <link rel="stylesheet" type="text/css" href="{%static 'style.css'%}">
        <title>Hello, pybo!</title>
    </head>
    <body>
        {%block content%}
        {%endblock%}
    </body>
    </html>
템플릿으로 만드는 표준 HTML 문서의 기본 틀
이제 개별 템플릿에서 block content, endblock 부분에서 구현해주면 된다.
ㄴ question_list.html
{%extends 'base.html'%}
{%block content%}
<div class="container my-3">
    <table class="table">
        <thread>
            <tr class="table-dark">
                <th>번호</th>
                <th>제목</th>
                <th>작성일시</th>
            </tr>
        </thead>
        <tbody>
            {%if question_list%}
            {%for question in question_list%}
            <tr>
                <td>{{forloop.counter}}</td>
                <td>
                    <a href="{%url 'pybo:detail' question.id %}">{{question.subject}}</a>
                </td>
                <td>{{question.create_date}}</td>
            </tr>
            {%endfor%}
            {%else%}
            <tr>
                <td colspan="3">질문이 없습니다.</td>
            </tr>
            {%endif%}
        </tbody>
    </table>
</div>
{%endblock%}
ㄴ question_detail.html
- style.css
폼
질문을 등록하는 기능 만들기
<a href="{% url 'pybo:question_create' %}" class="btn btn-primary">질문 등록하기</a>우선 question_list.html 파일에 버튼을 만들어준다. 질문 등록하기 버튼이다.
버튼을 클릭하면, pybo:question_create에 해당하는 URL이 호출될 것이다.
- URL 매핑
path('question/create/', views.question_create, name='question_create'),
- 폼
이제 urls.py 에서 정의한 것과 같이 views.py에 question_create 함수를 만들어야 한다.
그러나 그 전에 폼에 대해 알아보자.
폼은 페이지 요청시에 전달되는 파라미터를 관리하기 위해 사용하는 클래스이다.
폼에서 파라미터 형식, 값을 검증하고, HTML을 생성하거나 데이터를 저장하는 기능도 있다.
from django import forms
from pybo.models import Question

class QuestionForm(forms.ModelForm):
    class Meta:
        model = Question
        fields = ['subject', 'content']
위 파일에서 QuestionForm은 forms.ModelForm 모델 폼을 상속했다. 모델 폼은 모델의 데이터를 저장할 수 있는 폼이다.
모델 폼에는 Meta 클래스가 필요하다.
- 뷰
def question_create(request):
    form = QuestionForm()
    return render(request, 'pybo/question_form.html', {'form':form})
- 템플릿
{% extends 'base.html' %}
{% block content %}
<div class="container">
    <h5 class="my-3 border-bottom pb-2">질문등록</h5>
    <form method="post">
        {%csrf_token%}
        {{form.as_p}}
        <button type = "submit" class="btn btn-primary">저장하기</button>
    </form>
</div>
{%endblock%}
질문을 등록하는 화면의 템플릿을 작성해보자.
이때 {{form.as_p}}는 QuestionForm 객체
subject, content에 해당하는 HTML 코드를 자동으로 만들어준다.
이때 이 안에 써있는 <form method="post">에 주목해보자.
여기서는 특별히 form의 action을 지정하지 않았다. 그렇기 때문에 나중에 질문 등록뿐 아니라 다른 기능에서도 사용할 수 있게 된다.
- GET과 POST
def question_create(request):
    if request.method == 'POST':
        form = QuestionForm(request.POST)
        if form.is_valid():
            question = form.save(commit=False)
            question.create_date = timezone.now()
            question.save()
            return redirect('pybo:index')
    else:
        form = QuestionForm()
    context = {'form':form}
    return render(request, 'pybo/question_form.html', context)
동일한 URL을 POST, GET 방식에 따라 다르게 처리한다.
질문 등록하기 버튼을 클릭하면, GET 방식으로 question_create 함수가 클릭된다.
저장하기 버튼을 누르면, POST 방식으로 함수를 요청한다.
이 경우에..
- post 방식에서는
form = QuestionForm(request.POST)처럼 request.POST를 인수로 QuestionForm 객체를 생성한다.
이때 request.POST의 subject, content 값이 자동으로 저장된다.
그 다음에 form.is_valid()에서 form이 유효성을 검사한다.
만약 올바르지 않다면 오류 메시지가 출력될 것이다.
form이 유효한 경우에만 질문 데이터가 생성된다.
그 다음에 form을 임시 저장해서 Question 데이터를 저장한다.
이제 create_Date에 현재 시간을 설정해둔 위에 question 객체를 완전히 저장한다.
- 폼 위젯
from django import forms
from pybo.models import Question

class QuestionForm(forms.ModelForm):
    class Meta:
        model = Question
        fields = ['subject', 'content']
        widgets = {
            'subject' : forms.TextInput(attrs={'class':'form-control'}),
            'content' : forms.Textarea(attrs={'class':'form-control', 'rows':10}),
        }
폼 위젯으로 화면이 한결 깔끔해졌다.
- 폼 레이블
- 수동 폼 작성
{% extends 'base.html' %}
{% block content %}
<div class="container">
    <h5 class="my-3 border-bottom pb-2">질문등록</h5>
    <form method="post">
        {%csrf_token%}
        <!--오류 표시용 -->
        {%if form.errors%}
        <div class="alert alert-danger" role="alert">
            {%for field in form%}
            {%if field.errors%}
            <div>
                <strong>{{field.label}}</strong>
                {{field.errors}}
            </div>
            {%endif%}
            {%endfor%}
        </div>
        {%endif%}
        <!--오류 표시 end-->
        <div class="mb-3">
            <label for="subject" class="form-label">제목</label>
            <input type="text" class="form-control" name="subject" id="subject"
                value = "{{form.subject.value|default_if_none:''}}">
        </div>
        <div class="mb-3">
            <label for="content" class="form-label">내용</label>
            <textarea class="form-control" name="content"
                id = "content" rows="10">{{form.content.value|default_if_none:''}}</textarea>
        </div>
        <button type = "submit" class="btn btn-primary">저장하기</button>
    </form>
</div>
{%endblock%}
'Computer Science > BackEnd' 카테고리의 다른 글
| 점프 투 장고 #3-2 | 파이보 서비스 개발하기(회원가입, 모델 변경, 글쓴이 표시, 수정과 삭제) (2) | 2022.08.22 |
|---|---|
| 점프 투 장고 #3-1 | 파이보 서비스 개발 - 내비게이션 바, 페이징, 템플릿 필터, 답변 개수 표시, 로그인과 로그아웃 (0) | 2022.08.18 |
| 점프 투 장고 #2-2 | 장고 관리자, 조회와 템플릿, URL 별칭 익히기 (0) | 2022.08.15 |
| 점프 투 장고 #2 | 장고 URL, 뷰, ORM, 모델 익히기 (0) | 2022.08.13 |
| 점프 투 장고 #1 | 벡엔드 프레임워크, 장고 시작하기 (0) | 2022.08.11 |